This application is a task management system that integrates with Keycloak to provide user authentication, role-based access control (RBAC), and fine-grained access control on data.
Features
User Authentication: Secure user authentication integrated with Keycloak.
Role-Based Access Control (RBAC): Role mapping via Keycloak to assign roles such as admin, manager, and employee to users.
Fine-Grained Data Access Control: Policies and access control mechanisms to control user access to specific data or resources.
Task Management: Functionality to create, edit, and delete tasks, assign tasks to users or teams, set deadlines, priorities, and track task progress.
Custom Authorization Logic: Backend includes custom logic to complement Keycloak’s authorization services.
Technologies Used
Frontend: React, MUI
Backend: Node.js with Express.js, Postgres for data storage
Authentication and Authorization: Keycloak
API Communication: RESTful APIs
Deployment: Docker, Docker Composer
How to Run the Project
Ensure Docker and Docker Compose are installed on your machine.
Clone the repository and navigate to the project directory.
Run docker-compose up to start the services. This will build the Docker images if they haven’t been built already.
The frontend will be accessible at http://localhost:3000, and the backend will be accessible at http://localhost:5000.
License
This project is licensed under the terms of the MIT License.
#️⃣ What is gnomAD and the purpose of this script?
gnomAD (The Genome Aggregation Database)[1] is aggregation of thousands of exomes and genomes human sequencing studies. Also, gnomAD consortium annotates the variants with allelic frequency in genomes and exomes.
Here, this API with both CLI and GUI versions is able to search the genes or transcripts of your interest and retrieve variant data from the database via gnomAD backend API that based on GraphQL query language.
#️⃣ Update on the repository and gnomadR tool
After the last update on the repository, gnomAD GraphQL API has been updated, and the query syntax and most of the keywords were deprecated or altered. Hence, the batch script is currently not able to retrieve the data from the gnomAD API and not able to generate outputs and plots.
If you are still looking forward a tool that automates fetching the data from gnomAD and you like R lang, you might check gnomadR!
gnomadR package intends to provide an interface between R and the gnomAD API, powered by GraphQL. This package utilizes the qhql R package to send queries to gnomAD.
#️⃣ Requirements and Installation
Create a directory and download the “gnomad_api_cli.py” and “requirements.txt” files or clone the repository via Git using following command:
Install the required packages if you do not already:
pip3 install -r requirements.txt
The requirements.txt contains required libraries for both GUI (graphical user interface) and CLI (command-line interface) versions.
It’s ready to use now!
If you did not install pip yet, please follow the instruction here.
#️⃣ GUI | Usage
In the GUI version of gnomAD Python API, Streamlit has been used.
Note: In GUI version, it is possible to generate plots from the data retrieved.
This option is not available in CLI version since it is still under development.
So, it is recommended to use GUI version.
To use GUI version of gnomAD Python API:
streamlit run gnomad_api_gui.py
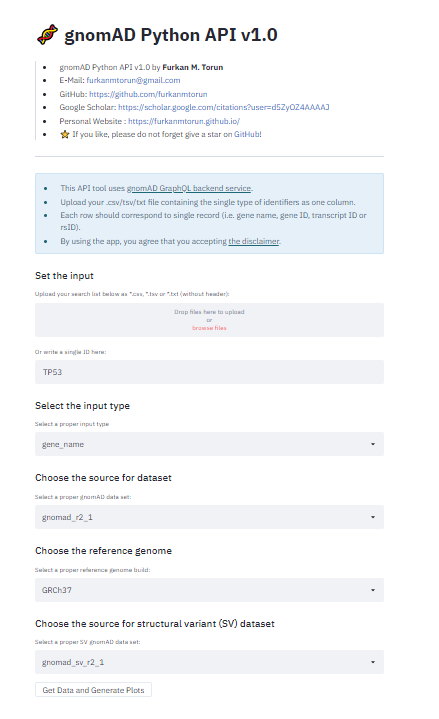
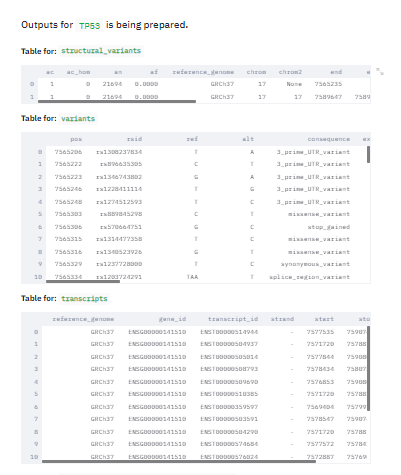
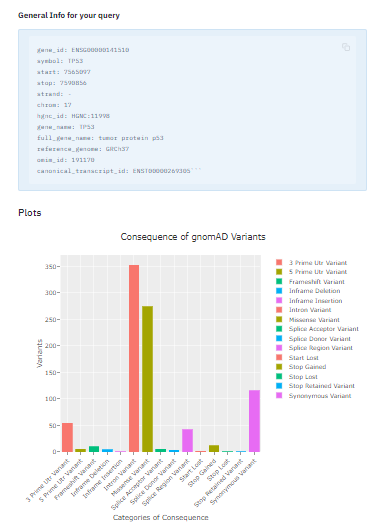
Here are the screenshots for the GUI version:
gnomAD Python API GUI – Main Screen
gnomAD Python API GUI – Outputs
gnomAD Python API GUI – Outputs and Plots
The outputs are also saved into outputs/ folder in the GUI version.
#️⃣ CLI | Usage & Options
Options
Description
Parameters
-filter_by
It defines the input type.
gene_name, gene_id, transcript_id, or rs_id
-search_by
It defines the input.
Type a gene/transcript identifier e.g.: TP53, ENSG00000169174, ENST00000544455 Type the name of file containig your inputs e.g: myGenes.txt
-dataset
It defines the dataset.
exac, gnomad_r2_1, gnomad_r3, gnomad_r2_1_controls, gnomad_r2_1_non_neuro, gnomad_r2_1_non_cancer, or gnomad_r2_1_non_topmed
-sv_dataset
It defines structural variants dataset.
gnomad_sv_r2_1, gnomad_sv_r2_1_controls, or gnomad_sv_r2_1_non_neuro
-reference_genome
It defines reference genome build.
GRCh37 or GRCh38
-h
It displays the parameters.
To get help via script:python gnomad_api_cli.py -h
❗ Here, for getting variants, gnomad_r2_1 and gnomad_sv_r2_1 are defined as default values for these two -dataset and -sv_dataset options, respectively.
❗ Also, you need to choose GRCh38 for retrieving variants from the gnomad_r3 dataset. However, in the GRCh38 build, structural variants are not available.
Karczewski, K.J., Francioli, L.C., Tiao, G. et al. The mutational constraint spectrum quantified from variation in 141,456 humans. Nature 581, 434–443 (2020). https://doi.org/10.1038/s41586-020-2308-7
For older versions minimum requirements are React versions with the useEffect hook 16.8.0 – 17.0.2
npm install react-superstore@0.0.8
Usage
Create a store anywhere in your app and pass in an initial state as the first argument in your createStore function and an optional reducer as the second argument. You can create as many instances as you like. The createStore function returns 3 functions in an array [useStore, setStore, getStore]:
useStore() which is to be used in your react component to use the store value. This is the function that will re-render your component when the store value changes This is a react hook and will need to be used in a react function component.
setStore() which sets the store and can be used anywhere in your app inside or outside of a react compoonent. This can be used just like reacts setState. You can set the store directly like setStore(newStore) or pass a function that has the current store value as an argument and return your new store value to set it setStore(currentStore => currentStore + 1). If you pass in a reducer then the reducer will be used to set the store instead.
getStore() which can be used anywhere in your app inside or outside of a react component to get the store value. You can use this inside a react component but it won’t cause a re render of the component.
Simple Pattern Usage
Lets show some examples. We will make a simple counter.
The function returns an array of the 3 functions so you can destructure them and call them whatever you like. In this case we will extract the useStore, setStore and getStore functions and call them useCount, setCount and getCount.
import{useCount,setCount}from'location of your store'functionCounter(){constcount=useCount()consthandleClick=()=>setCount(count+1)return(<><p>Count: {count}</p><buttononClick={handleClick}>+</button></>)}
Reducer Pattern Usage
You can pass a reducer as the second argument in your createStore function and then the setStore function will use the reducer to set the store.
Consume in your component and use just like the simple example above but now you will use the reducer when you call your dispatch function.
import{useCount,setCount}from'location of your store'functionCounter(){constcount=useCount()consthandleClick=()=>setCount({type: 'INCREASE'})return(<><p>Count: {count}</p><buttononClick={handleClick}>+</button></>)}
Maximize Performance And Avoid Unwanted Re-Renders
By default the useStore() hook returns then entire store. You can pass in a selector function to return only the values that you want to use in your component. This will trigger a shallow compare when setting the store that compares the previous store to the new store. The selector function should include one argument that will be the current store value and then you should return the values that you want to use. Eg. const foo = useStore(store => store.foo). Consider the following example.
In your react component you can do the following and your component will only re-render if the foo value changes. If the bar or baz values change your component will not re-render.
import{useStore}from'location of your store'functionReactComponent(){constfoo=useStore((store)=>store.foo)return<p>Foo: {foo}</p>}
Or you can return an object and the dispatch function will shallow compare values for equality. In the following you can map the foo and bar values to your component and then you can avoid re-renders if the baz value changes.
import{useStore}from'location of your store'functionReactComponent(){const{ foo, bar }=useStore((store)=>{return{foo: store.foo,bar: store.bar,}})return(<p>
Foo: {foo} - Bar: {bar}</p>)}
Usage With Typescript
Stores are fully typescript compatible. When you create a store just pass in the store type to get your types inferred while using the store.
React is a popular UI library for building web apps. Vite is a powerful tool for building javascript apps that bundles all of your code and shows immediate changes while you’re editing.
What’s in this project?
← README.md: That’s this file, where you can tell people what your cool website does and how you built it.
← index.html: This is the main page template React uses to build your site–it imports index.jsx to kick things off. When you’re ready to share your site or add a custom domain, change SEO/meta settings in here.
← src/: This folder contains all the files React will use to build your site.
Working in the src/ folder 📁
React defines site components in JSX, an extended version of JavaScript, so you’ll see lots of .jsx files in the project.
← src/index.jsx: This is the root of your React app. The index script is imported in the site home template index.html. If you add libraries like chakra-ui or redux, you’ll insert their providers here. The <HelmetProvider> is an example of a provider you’d use.
← src/app.jsx: The base for defining your React app, this script imports the components that make up the site content. The index.jsx file imports the App script. The router (from wouter 🐰) is also imported here.
← src/styles: CSS files add styling rules to your content. You have a lot of importing options for CSS including CSS modules if that’s your jam.
← src/components/router.jsx: One of the most important parts of a single page app is the router. It’s how we know what page to show–the code maps the paths to the Home component. We’re using Wouter, a tiny minimalist router. You could replace it for something like React Router.
← src/components/seo.jsx: When you share your site on social media, you’ll want to make sure the meta tags are correct and that you’ve got an image. All of the settings for this file are in src/seo.json.
Hooks 🪝
← src/hooks/: Hooks are a powerful way to provide interaction with your app.
← src/hooks/wouter-hash.jsx: We use hashed routing with wouter.
Pages 📃
← src/pages/: These files include components that specify the content of the Home and About pages. Each one is defined as a function and referenced in router.jsx. The content is built into the page outline specified in app.jsx.
← src/pages/home.jsx The content of the Home page, also defined as a component function. The page includes the animated effect on hover, and title change effect on click (which is also a handy demo of using state data in React).
A simple AWS Lightsail webservice deployment with Terragrunt.
Use case
A webservice should respond with a defined text (display-text). The value is sensitive and should be suppressed in terraform logs and provided via an environment variable ECHO_TEXT
There should be development and production stage. Both can be configured independently.
The platform is AWS with focus on Lightsail
The domain management should be managed by Route53 too
Terraform and Terragrunt should be used
Solution sketches
There are two solutions to solve the use case.
Use containers (modules/webservice-container)
Lightsail provides an integrated domain, certificate and load balancing management.
The current AWS provider doesn’t provide the load balancer domain but the URL of the load balancer.
The URL must be formated to be used for an alias for Route53.
Also a predefined zone ID must be used for the corresponding AWS region.
Use instances (modules/webservice-instance)
Lightsail can use managed EC2 instance with a load balancer.
The load balancer can be equipped with certificates and custom domain names, that can be aliased with Route53.
On the EC2 instance a regular docker daemon can be installed and ports for services can be published.
Deploy
For the development stage do
cd stage/dev
terragrunt apply -auto-approve
For the production stage do
cd stage/prod
terragrunt apply -auto-approve
Configuration
Parameter
Meaning
display-text
Text to be returned by webservice
domain
Domain of the service
ec2-enable-access-ssh
Enable public SSH access (only for instance)
enforce-https
Enforce redirection to HTTPS (only for instance)
service-instances
Number of running contains (only for containers)
service-power
Lightsail instance type to use
Set the corresponding parameters for
Development stage in stages/dev/terragrunt.hcl
Production stage in stages/prod/terragrunt.hcl
Trouble shooting
Missing field for DNS validation records
aws_lightsail_certificate used domain_validation_options and aws_lightsail_lb_certificate used domain_validation_records instead.
Can’t deploy due dependent data that’s available only after creation of resources
Certificate status isn’t evaluated in a nice way for aws_lightsail_certificate and aws_lightsail_lb_certificate. Use the target parameter to deploy certain resources first e.g.
# For EC2 solution
terragrunt apply -auto-approve -target=aws_lightsail_lb_certificate.frontend
# For container solution
terragrunt apply -auto-approve -target=aws_lightsail_certificate.webservice
This repository contains the source code used to perform the experimental evaluations in the paper entitled A Divide-and-Conquer Parallel Pattern Implementation for Multicores, presented at SEPS 2016.
In the repository you can find the applications used for the evaluations and the backend implementation of the Parallel Divide and Conquer pattern in OpenMP, Intel TBB and Fastflow.
The pattern (and related backend implementations) can be used to easily parallelize other Divide and Conquer algorithms. Details on the interface can be found in the paper.
Applications
To understand how the pattern works and its interface a basic example for the n-th fibonacci number computation is provided.
The main applications used for the evaluation are essentially three: the merge- and quick-sort algorithms
and the Strassen algorithm for matrix multiplication. It is important to notice that for the three applications the main program is the same for the different backends (can be found under the src/ folder). The different backends can be selected by using proper compiler directives (USE_OPENMP for OpenMPUSE_TBB for the Intel TBB version and USE_FF for the FastFlow version).
In addition, to compare the pattern based version with third-party algorithms are present hand-made parallelizations of the aforementioned applications (for the merge-sort comparison we used the stable sort implementation provided by Intel here).
Usage
Required software
The artifact uses external software. In particular:
FastFlow: a C++ parallel programming framework targeting shared-memory architectures. Website: http://calvados.di.unipi.it/
In the sequel we will provide a brief description for their downloading
Fastflow
It is an header-only library. Therefore, it is only required to download it from the website or the SVN. To download the latest version and save it into the fastflow directory, run the following
command in the shell:
Before compiling the user must provide two diffent environment variables: FASTFLOW_DIR that points to the FastFlow library directory and INTEL_STABLESORT_DIR that points to the directory that contains the Intel source code (used for the comparison), After that, the code can be compiled. The set of command is the following:
 $ export FASTFLOW_DIR=<...path to fastflow...>
 $ export INTEL_STABLESORT_DIR=<... path to intel source code...>
 $ make -j
This will produce different executables:
fibonacci_dac_{openmp,tbb,ff}: are the the parallel pattern based implementations of the fibonacci problem that use the OpenMP, Intel TBB and FastFlow backends respectively;
mergesort_dac_{openmp,tbb,ff}: that are the parallel pattern based implementations of the mergesort problem;
quicksort_dac_{openmp,tbb,ff}: the implementations for the quicksort problems for the different backends;
strassen_dac_{openmp,tbb,ff}: implementations for the Strassen matrices multiplication algorithm;
stable_mergesort_dac_{openmp,tbb,ff}: implementation of the Intel Stable Sort algorithm used for the comparison. It is essentially the same algorithm (with the same classes and data types) provided by Intel whose divide-and-conquer part is parallelized using the proposed pattern;
quicksort_hm_{openmp,tbb} and strassen_hm_{openmp,tbb}: hand made parallelizations for OpenMP and TBB
intel_sort_{openmp,tbb}: the intel version of the program. Can be compiled directly from the source codes provided in the Intel WebSite.
Each of these programs require certain parameters. To see the right sequence it is sufficient to invoke the program without arguments.
How to Cite
If our work is useful for your research, please cite the following paper:
@inproceedings{10.1145/3002125.3002128,
 author = {Danelutto, Marco and De Matteis, Tiziano and Mencagli, Gabriele and Torquati, Massimo},
 title = {A Divide-and-Conquer Parallel Pattern Implementation for Multicores},
 year = {2016},
 isbn = {9781450346412},
 publisher = {Association for Computing Machinery},
 address = {New York, NY, USA},
 url = {https://doi.org/10.1145/3002125.3002128},
 doi = {10.1145/3002125.3002128},
 booktitle = {Proceedings of the 3rd International Workshop on Software Engineering for Parallel Systems},
 pages = {10–19},
 numpages = {10},
 keywords = {Divide and Conquer, High-level parallel patterns},
 location = {Amsterdam, Netherlands},
 series = {SEPS 2016}
}
RaspEye is a result of playing with Raspberry Pi Zero with a camera module for it. It is a project that has client- and server-side programs (in separate repositories).
This is the server. This is still quite a new project and you can spot lots of imperfections that I’m aware of. I will clean the code up, although I have little time for developing this project, so the progress won’t be fast, but should be stable.
raspeye-srv
Its three main functions are:
Motion-detection – detecting motion using RPi camera and eventually sending notification to client/email/IM… (at the moment it detects motion and saves pictures to its directory) In future plans I’m going to implement different algorithms of motion detection.
Time lapse – takes sequence of pictures.
Preview mode – just gives preview for the client.
The functions/modes work simultaneously. Motion detection is going to work continuously with ability to terminate it and start it again. Time lapse can be set up to start at a certain date and time. Preview mode is limited to 1 client at the moment, but it will change in future.
I’m going to make a separate development branch so the code in the master branch should stay usable. The master branch should always have the tested code that should run on any Raspberry Pi.
To run the server you need to place the files in the same directory and start raspeye-srv.py with the port number like that:
python3 raspeye.py 12345
where 12345 is the port number the server is going to use (usually you need to set up port forwarding on your router).
Dependencies:
numpy (motion detection)
picamera
and modules from standard library like: threading, socket, datetime, json, struct,…
As a client you can use raspeye-guiz.py from the other repository.
To install it you need the files to be in the same directory:
raspeye-srv.py,
preview.py,
motion_detection.py,
timelapse.py,
constants.py
The project is being created on a Raspberry Pi Zero v1.3 with 1st gen. camera module.
I use Python3 for the development.
This is a tool that allows you to create a DASH manifest from any fmp4 stream or file (just 1 h264 / AAC track allowed)
For the online version all the process is done inside the browser, so the input fmp4 file is NOT uploaded anywhere making segmentation process fast and secure.
We use byte ranges request inside the DASH manifest so that allows you to use the same fmp4 file as a source without having to modify it / split it.
You can also execute the same segmenter in the CLI (nodeJS), and then you can also use it to segment a live fmp4 TCP stream or a local fmp4 file, in that case the chunks can be generated and saved to the local disc and we will not use byte ranges.
Select the desired target duration (by default it creates a new item at every moof atom), and select a .mp4 (fragmented) file from your local computer (see note 1), or put a URL of any fmp4 file (remember should have a proper CORS policy)
The .mp4 file will be processed in YOUR browser and the resulting DASH manifest will be displayed
Testing the results:
Copy the resulting manifest data in a file in the same directory where your .mp4 file is, for example dash.mpd
Put a webserver in front of those files, for instance node-static, and play that manifest with any DASH player (I recommend you to use DASH-IF referece player ). Remember you will need to fake CORS since you will be serving the manifest and media from localhost
You can execute ./fmp4-stream-segmenter-cli.js (without arguments) to get help about input parameters
//TODO: live – tcp mode
TODO: Usage in the console to process TCP streams (live)
It provides a server TCP socket to ingest a TS TCP stream, and it generates a live EVENT or WINDOW chunklist, it also saves the chunk files indicating them as growing files, useful if you want to implement LHLS or reduce latency using chunked transfer. See Note 2 if you want to test it.
You can execute ./transport-stream-segmenter-tcp.js (without arguments) to get help about accepted parameters
Note 1: If you do not have any ts file you can generate one by using ffmpeg:
# This will generate a 15s video only fmp4
# Generate video real time (remove -re if you just want to generate the file quicker)
ffmpeg -f lavfi -re -i smptebars=duration=15:size=320x200:rate=30 \
-pix_fmt yuv420p -c:v libx264 -b:v 250k -g 30 -keyint_min 120 -profile:v baseline -preset veryfast \
-f mp4 -movflags empty_moov+omit_tfhd_offset+frag_keyframe+default_base_moof demo_video.mp4

# This will generate a 15s audio only fmp4
# Generate audio real time (remove -re if you just want to generate the file quicker)
ffmpeg -f lavfi -re -i sine=frequency=1000:duration=15:sample_rate=44100 \
-c:a libfdk_aac -b:a 96k \
-f mp4 -movflags empty_moov+omit_tfhd_offset+frag_keyframe+default_base_moof demo_audio,mp4
//TODO live – tcp mode
Note 2: If you do not have any encoder able to generate a TS TCP stream, you can execute the following script included in this repo (it uses ffmpeg behind the scenes):
This library is designed to standardize communication for API requests and responses in a microframework. It provides a consistent structure for headers and content, ensuring uniformity across different endpoints. The library helps developers easily wrap their endpoint-specific logic within a predefined request and response format.
Request Structure
The request JSON object consists of two main parts: header and content.
Header
The header contains metadata about the request and the device making the request. This includes information like device type, brand, OS version, and security token.
Below is an example of how to use this library in a Golang project to create a standard success response.
To use this library, you need to use the middleware function api.ProcessRequest()
See other helpful midlewares in the file ./middleware.go
In this example, the handler function creates a standard success response with a status code of 200 and some content. It then writes this response to the HTTP response writer. This ensures that all responses follow the same structure and include the necessary metadata.
Contributing
If you have suggestions for how We could be improved, or want to report a bug, open an issue! We’d love all and any contributions.
If you find this repository helpful and would like to support its development, consider making a donation. Your contributions will help ensure the continued improvement and maintenance of this repository.